Today we are going to show you how to Fix Auto Restart Problems In Windows 11. So let’s get started so first thing what you have to do is just follow below step.
Fix Windows 11 Restarting Automatically
- Press Windows and X key all together.
So this will take you to one from there you just have to click on search and there you have to search task manager. in short you have to search for tsk mgr.
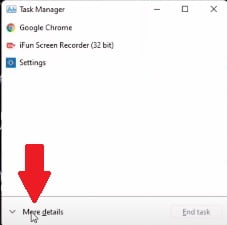
i’ll just have to present it and you’ll be getting like that. Now you have to click on more details.
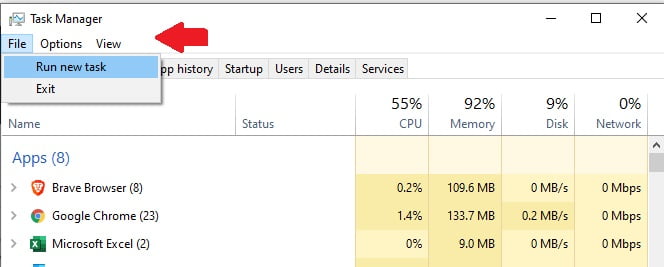
from there you have to select file and you have to click on run new task.
from there as you can that you have to browse your file okay which is very important you have to click on browse. Now from there you have to follow my instructions.
Flow below Step.
- so what you have to do is just have to select this pc
- you have to navigate to just have to select this pc and local c drive
- from there we have to select windows folder
- and from there we have to select system32
- After you have to select a file named cmd
- you have to click open and now you’ll be getting an option like the c windows system32
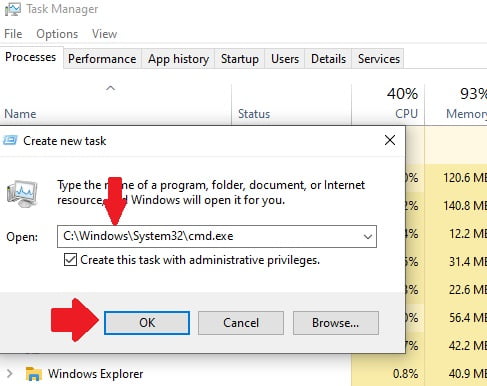
C:\Windows\System32\cmd.exe
- Now you have to tick create this task with administrative privileges
- Click ok windows command will open
I give you few commands so on the cmd so the first one is you have to type on the cmd which is
gpuupdate
- Now you just have to press enter this will take a little bit time you just have to wait for it. After that you just have to type cls which means you just have to close it.
- Now you have to give one more command which is very important.
chkdsk c /f /r
space according to your system we have to give because mine is being stored in the location c and if it is your d you have to give d. If it is E you have to give E mine is locally c so i have to give for it and go for enter.
okay once it is done what you have to do is next is you just have to exit.
Solution Number 2: Fix Auto Restart Problems In Windows 11
Next instructions what you have to follow.
- click on search and the next is you have to type regedit you have to click over there run as administrator and go for yes.
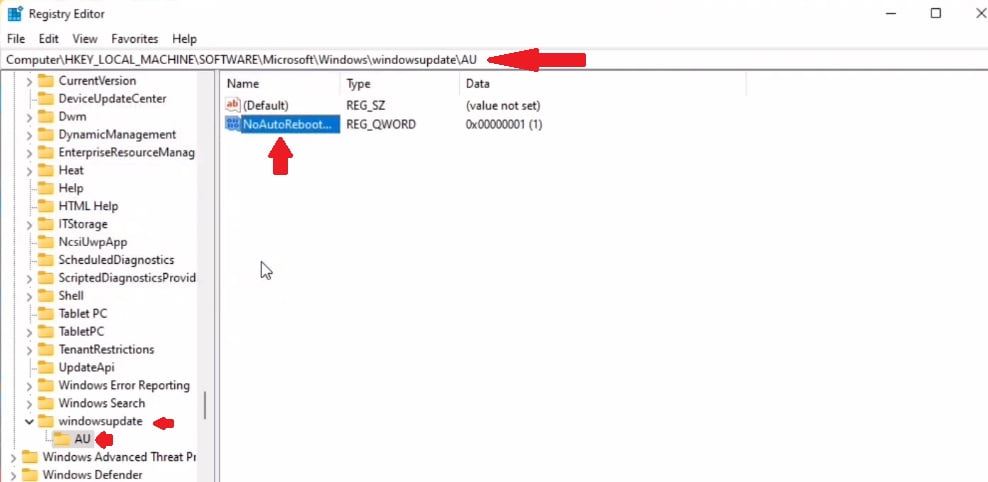
- And Open REGEDIT-HKEYLOCALMACHINE\SOFTWARE\MICROSOFT\WINDOWS
- Create a new key and name it WINDOWS UPDATE– Create one more key and name it AU-Select it and navigate to QW64 (According to your pc) select either Q32 If it is 32 bit or Q64 If it is 64 bit. No add name as follows NoAutoRebootWithLoggedOnUser and change 1 and value to 1 from 0.
How to Fix Auto Restart Problems In Windows 11 in Deatials.
local machine first now from here what you have to do is just click on software expand this. Now from there we
have to navigate to Microsoft selected expanded. And from there we have to keep scrolling down and you have to find windows keep scrolling now as you can see that we have windows. So you have to click over here
right click and create new key windows update okay it is done.
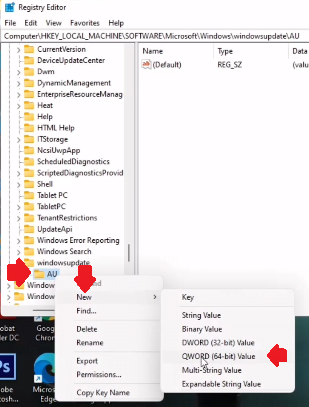
Again you have to select windows update and right click create one more key AU and once it is done. You have to select AU that one and from there what you have to do is just have to right click according to your system. my is 64 bit so i have to selected 64 bit if it is 32 we can go for 32bit. Here I have to give a name which is very important.
NoAutoRebootWithLoggedOnUser
Okay it is done so now we have created a key just have to right click on this and click on modify and here the value is 0 right you have to change the value to 1 go for okay and you just have to close this. And do a restart and most probably the issue will be completely fixed.


