Before you can start using DirectX on your computer, you need to make sure that it’s properly installed. In this article, we’ll show you how to Install DirectX on Windows 11 machine.
Contents
DirectX is a software package from Microsoft that is used by many PC games.
1. DirectX is a software package from Microsoft that is used by many PC games.
2. To install DirectX, you will need to download the installer from the Microsoft website.
3. Once the installer has been downloaded, double-click on it to run it.
4. Follow the instructions that appear on the screen to complete the installation.
5. Once DirectX has been installed, you will be able to play PC games that require it.
It is also used by some non-gaming applications like Adobe Photoshop.
DirectX is a set of APIs (Application Programming Interfaces) used by Windows programs, especially games, to work directly with your video and sound card hardware. Many modern games and other high-performance multimedia software require DirectX for optimum performance. DirectX also provides a standardized way for these programs to access your hardware, which can result in better compatibility and fewer driver issues.
While most games will automatically install the latest version of DirectX when they are installed, you may occasionally need to update DirectX on your own. This is especially true if you are running an older version of Windows. Updating DirectX is easy and only takes a few minutes.
Download & Install the latest version of DirectX
DirectX is a set of APIs (Application Programming Interfaces) used by Windows programs to access video, audio, and input devices.
The latest version of DirectX is DirectX 12.0, which was released in July 2015.
To install DirectX on your Windows computer, you will need to download and install the latest version of the DirectX End-User Runtime.
The easiest way to do this is to use the Microsoft Store. Simply search for “DirectX” in the store, and then click “Download” on the DirectX End-User Runtime page.
Once the download is complete, run the installation file and follow the on-screen instructions. Once DirectX is installed, you will be able to run any DirectX 12 compatible applications or games on your Windows computer.
DirectX is the latest version of DirectX.
DirectX is a set of APIs (Application Programming Interfaces) developed by Microsoft. It is used by games and other high-performance multimedia applications to improve PC performance.
You can install DirectX on your Windows PC in two ways: manually or automatically.
If you choose to install DirectX manually, you need to download the installer from the Microsoft website. Once you have downloaded the installer, run it and follow the instructions on the screen.
If you choose to install DirectX automatically, your PC will download and install the latest version of DirectX automatically. This method is recommended for most users.
You can install DirectX on Windows 11, 10, 8, 7, and Vista.
If you want to install DirectX on your Windows 11, 10, 8, 7, or Vista computer, you can do so by downloading and running the DirectX End-User Runtime Web Installer.
This installer will download and install the files needed to run DirectX on your system. Once the installation is complete, you will be able to use all of the features that DirectX provides.
If you are not sure which version of DirectX you need, you can check the Microsoft website for more information.
Once you have downloaded and installed DirectX, you may need to restart your computer for the changes to take effect. After restarting your computer, you will be able to use all of the features that DirectX provides.
There are two ways to install DirectX: manually or using the Windows Update service.
If you prefer to use the Windows Update service Follow the below instruction.
- Open Windows Settings by pressing the Windows key + I on your keyboard.
- Click on “Update & Security.”
- In the left pane, select “Windows Update.”
- Click on the “Check for updates” button in the right pane. Windows will now check for available updates, including DirectX updates.
- If there are DirectX updates available, they will be listed under “Optional updates.”
- Select the DirectX update, and then click on the “Download and install” button to install it.
- Windows will download and install the DirectX update automatically.
- After the update is installed, you may need to restart your computer to complete the installation.
Note: that Windows Update will usually take care of DirectX updates for you. However, in some cases, you might need to manually download and install the latest version of DirectX from the Microsoft website. To do this:
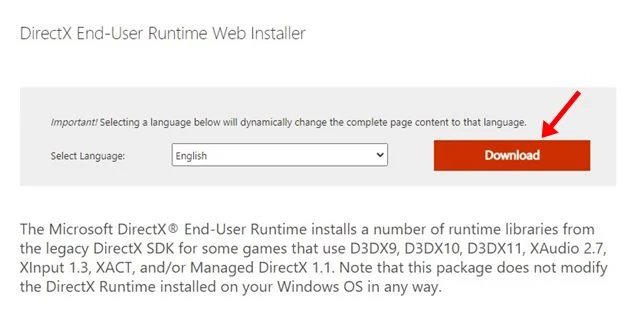
- Visit the Microsoft DirectX End-User Runtime Web Installer page: https://www.microsoft.com/en-us/download/details.aspx?id=35
- Click the “Download” button to download the web installer.
- Run the downloaded file to start the DirectX installation process.
- Follow the on-screen instructions to complete the installation.
Remember, DirectX is primarily for Windows operating systems, and the version you can install depends on your Windows version. Always ensure you are downloading DirectX from official Microsoft sources to avoid any potential security risks or compatibility issues.


