If you’re someone who likes to keep their desktop looking spick and span, then you know how important it is to have customized folder pictures. Here’s a quick and easy guide on Change Folder Picture in Windows 11!
Change Folder Picture in Windows 11 Few Easy Methods
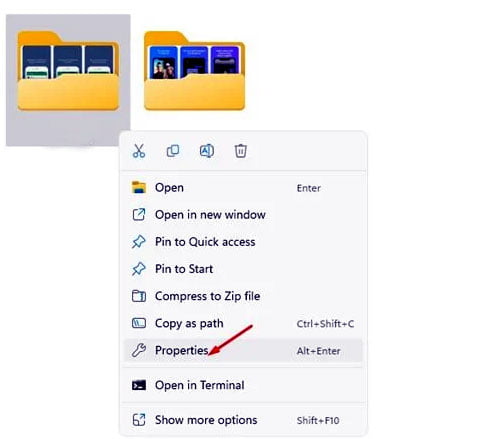
In order to change a folder picture in Windows 11, the first step is to select the folder. To do this, open up File Explorer and navigate to the folder that you want to change the picture for. Once you have found the folder, right-click on it and select “Properties” from the menu that appears.
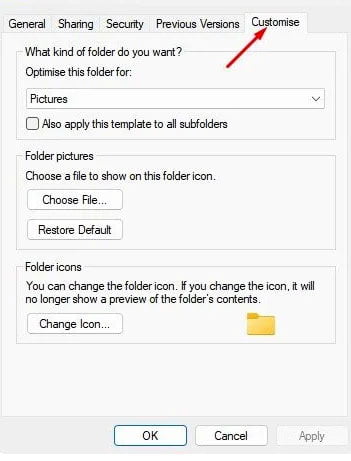
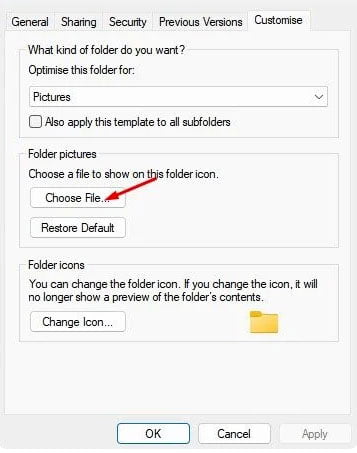
Next, click on the “Customize” tab that is located at the top of the Properties window. Under the Folder pictures section, click on the “Choose File” button. This will open up a new window where you can browse for the picture that you want to use. Once you have found the picture, click on it and then click on the “Open” button.
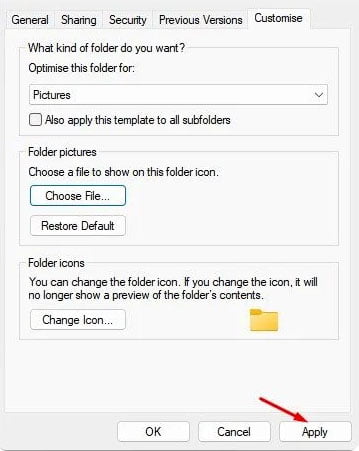
Finally, click on the “Apply” button and then click on the “OK” button to save your changes. Your folder should now have the new picture that you selected.
Easy Method
1. Open the Folder
2. Right-Click on the Folder
3. Select “Properties”
4. Click on the “Customize” tab
5. Click on the “Choose File” button
6. Select the image you want to use as the folder picture
7. Click on the “Open image folder
8. Click on the “Apply” button
9. Click on the “OK” button
Change the picture of a folder in Windows 11 , 10, 8, follow these steps:
1. Select the folder you want to change the picture of.
2. Right-click on the folder and select “Properties.”
3. In the Properties window, select the “Customize” tab.
4. Under “Folder pictures,” click on the “Choose File” button.
5. Select the image you want to use as the folder picture.
6. Click on the “OK” button.
Windows 11 Slow? How to Improve It
Find the Picture You Want to Use
The first step to changing the folder picture in Windows is to find the picture you want to use. This can be any image stored on your computer. Once you have found the image you want to use, right-click on it and select “Copy” from the menu that appears.
Next, open the folder whose picture you want to change. Right-click on the folder and select “Properties” from the menu that appears. In the “Properties” window, click on the “Customize” tab.
Click on the “Choose File” button under the “Folder pictures” section. This will open a new window where you can select the image you want to use as the folder picture. Select the image you copied earlier and click on the “Open” button.
Finally, click on the “Apply” button and then the “OK” button to save your changes. The new picture will now be displayed when you open the folder.
How To Change Desktop Icons
1. Click on the “Start” button.
2. Select “Control Panel.”
3. Click on “Appearance and Themes.”
4. Select “Change Desktop Icons.”
5. Right-click on the folder you want to change.
6. Click on “Properties.”
7. Select the “Customize” tab.
8. Click on the “Change Icon” button.
9. Select the icon you want to use and click “OK.”
The Ultimate Guide To Uninstall Updates In Windows 11
Changing your folder picture in Windows is a quick and easy process.
To start, simply click on the folder that you want to change the picture for. Once you have clicked on the folder, find the “Picture” tab near the top of the window. Under the “Picture” tab, you should see an option that says “Change Folder Picture.”Click on this option and a new window will open.
In the new window, you will see a number of different pictures that you can choose from. If you don’t see any pictures that you like, you can also click on the “Browse” button to find a picture stored on your computer. Once you have found a picture that you like, simply click on it and then click on the “Open” button.
After you have selected your picture, all that is left to do is click on the “Apply” button and then the “OK” button. Your new folder picture will now be applied!


