Windows 11 Security is a critical feature that helps protect your device from malware, viruses, and other threats. While you can enable it through the standard graphical interface, using PowerShell provides a powerful and efficient way to automate the process, especially useful for IT professionals managing multiple devices. In this article, we’ll walk you through the steps to enable Windows 11 Security using PowerShell.
Why Use PowerShell to Enable Windows Security?
PowerShell is a command-line tool that allows for advanced automation and scripting, making it ideal for managing Windows systems at scale. By using PowerShell, you can enable or configure Windows Security across multiple devices quickly, ensuring consistent security settings without manual intervention.
Prerequisites
Before you begin, ensure that:
- You have administrative privileges on the device.
- Windows PowerShell is installed on your system (it comes pre-installed on Windows 11).
- Windows Security features are not disabled by Group Policy.
Steps to Enable Windows Security with PowerShell
Step 1: Open PowerShell with Administrative Privileges
To perform security-related tasks, you’ll need to run PowerShell as an administrator:
- Right-click the Start button and select Windows Terminal (Admin) or Windows PowerShell (Admin).
- If prompted by User Account Control (UAC), click Yes to grant administrative access.
Step 2: Enable Windows Defender Antivirus
Windows Defender Antivirus is a core component of Windows Security. To enable it, use the following PowerShell command:
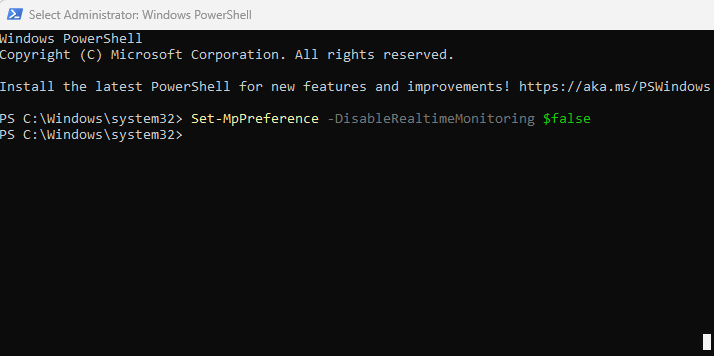
Set-MpPreference -DisableRealtimeMonitoring $false
This command ensures that real-time monitoring, which scans files and processes in real-time, is active.
Step 3: Enable Windows Firewall
Windows Firewall helps block unauthorized network traffic. To enable it, run the following command:
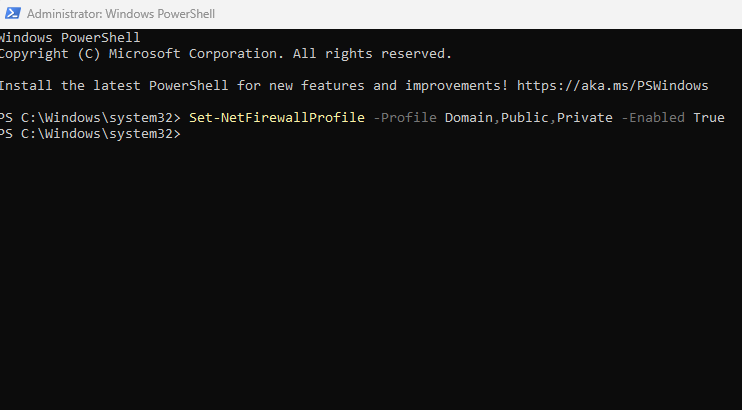
Set-NetFirewallProfile -Profile Domain,Public,Private -Enabled True
This command enables the firewall for all network profiles: Domain, Public, and Private.
Step 4: Enable Tamper Protection
Tamper Protection prevents unauthorized changes to essential security settings. You can enable it with this command:
Set-MpPreference -DisableTamperProtection $false
This command ensures that critical security settings are protected from being altered by malicious software.
Step 5: Enable Cloud-Delivered Protection
Cloud-delivered protection offers rapid updates and cloud-based security intelligence. Enable it using this command:
Set-MpPreference -MAPSReporting Advanced
This command sets the Microsoft Active Protection Service (MAPS) to the advanced level, providing enhanced cloud-based protection.
Step 6: Enable Automatic Sample Submission
Automatic sample submission allows Windows Defender to send suspicious files to Microsoft for analysis. To enable it, run:
Set-MpPreference -SubmitSamplesConsent SendSafeSamples
This command configures Windows Defender to automatically submit safe samples, ensuring that suspicious files are analyzed without user intervention.
Step 7: Verify Windows Security Status
After enabling the necessary components, it’s important to verify that Windows Security is fully operational. Run the following command:
Get-MpComputerStatus
This command displays the current status of Windows Defender Antivirus, including real-time protection, virus definitions, and other key settings.
Automating the Process with a Script
If you manage multiple devices, you can automate the entire process by creating a PowerShell script. Here’s an example script that combines all the commands:
# Enable Windows Defender Antivirus Real-time Monitoring

Set-MpPreference -DisableRealtimeMonitoring $falseSet-NetFirewallProfile -Profile Domain,Public,Private -Enabled True
Set-MpPreference -DisableTamperProtection $false
Set-MpPreference -MAPSReporting Advanced
Set-MpPreference -SubmitSamplesConsent SendSafeSamples
Get-MpComputerStatus
Save this script with a .ps1 extension (e.g., EnableWindowsSecurity.ps1) and run it as an administrator to apply the settings across multiple systems.
Conclusion
Enabling Windows 11 Security using PowerShell is a straightforward process that can be easily automated for managing multiple devices. By following these steps, you can ensure that your Windows 11 systems are protected against a wide range of threats. PowerShell’s automation capabilities make it an essential tool for IT administrators looking to enforce consistent security policies across an organization.
For ongoing security, remember to regularly check the status of Windows Security features and keep your system up to date with the latest security patches.


Comments 1