What Is Active Directory Lightweight Directory Services?
Active Directory Lightweight Directory Services (AD LDS) is a specialized directory service offered by Microsoft as part of the Windows Server operating system. Designed to be a lightweight and flexible alternative to the full-scale Active Directory (AD), AD LDS provides directory services functionality without the complexities associated with a complete AD infrastructure.
At its core, AD LDS serves as a directory store for data related to identity management. It allows organizations to create and manage directory-enabled applications, offering a centralized repository for information such as user identities, access controls, and other attributes. What distinguishes AD LDS from its counterpart, Active Directory Domain Services (AD DS), is its focus on providing directory services tailored for specific applications rather than serving as the primary directory service for an entire network.
Key features of Active Directory Lightweight Directory Services include
Lightweight and Flexible Design: As the name suggests, AD LDS is lightweight and can be tailored to the specific needs of an organization. It is well-suited for scenarios where a comprehensive AD infrastructure might be overkill, such as in applications or services that require a directory but don’t necessitate a full AD deployment.
Multiple Instances on a Single Server: AD LDS supports the creation of multiple instances on a single server. This allows organizations to compartmentalize data and configurations for different applications, departments, or services while maintaining a single server environment.
Security and Access Control: AD LDS provides robust security features, including access controls and permissions, to ensure that only authorized users and applications can access and modify directory data. This is crucial for maintaining the integrity and confidentiality of sensitive information.
Integration with Active Directory: While AD LDS operates independently, it can also be integrated with Active Directory Domain Services. This integration allows for the synchronization of data between AD LDS and AD DS, ensuring consistency across different directory services within an organization.
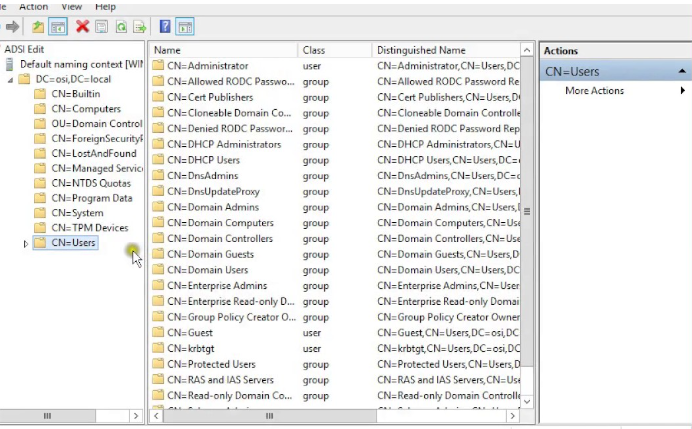
Administration Tools: Microsoft provides a set of administration tools specifically designed for managing AD LDS instances. These tools include the ADSI Edit snap-in, Ldp.exe, and the Active Directory Sites and Services console, offering administrators the means to configure, monitor, and troubleshoot their AD LDS environments.
How to Setup Active Directory Lightweight Directory Services
Setting up Active Directory Lightweight Directory Services (AD LDS) involves several key steps to ensure a smooth and tailored deployment. Below is a step-by-step guide to the setup process:
1. Determine Requirements
Before beginning the setup, it’s crucial to identify the specific requirements of your organization. Understand the purpose of deploying AD LDS, the data it will store, and the applications or services it will support. This initial planning phase lays the foundation for a successful deployment.
2. Install AD LDS Role
Open the Server Manager on the Windows Server machine.
Navigate to “Manage” and select “Add Roles and Features.“
Choose the server where you want to install AD LDS and proceed to install the AD LDS role.
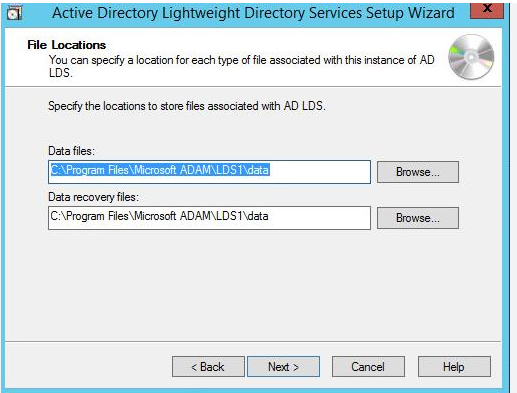
After installing the AD LDS role, launch the Active Directory Lightweight Directory Services Setup Wizard.
Choose the option to “Create a new instance of AD LDS.”
Define the fully qualified domain name (FQDN) for the AD LDS instance.
Specify the port for the AD LDS instance (default is 389 for LDAP).
Configure SSL settings if needed for secure communication.
4. Define Partitions
During setup, define the application directory partition. This is the container for your directory data.
Decide on the distinguished name (DN) for the application directory partition.
Configure settings related to replication and permissions for the partition.
5. Specify Access Controls
Set up access controls to define who can access and modify data within the AD LDS instance.
Configure permissions based on roles and responsibilities.
Ensure that security settings align with organizational policies.
6. Complete Setup
Review the configuration settings to ensure accuracy.
Complete the setup process, and the wizard will create the AD LDS instance based on the provided parameters.
Verify that the AD LDS service is running.
7. Integrate with Applications (Optional)
If AD LDS is intended to support specific applications, integrate it with those applications.
Update application configurations to connect to the newly created AD LDS instance.
8. Testing and Troubleshooting
Conduct thorough testing to ensure that the AD LDS instance is functioning as expected.
Use administration tools like ADSI Edit and Ldp.exe to monitor and troubleshoot any issues.
9. Documentation
Document the AD LDS configuration, including instance details, partitions, and access controls.
Maintain clear documentation for future reference and potential scalability.
Back Up or Restore an AD LDS Instance
Backing up and restoring an Active Directory Lightweight Directory Services (AD LDS) instance is a critical aspect of maintaining data integrity and ensuring business continuity. Here’s a step-by-step guide on how to perform these tasks:
Backing Up an AD LDS Instance
Use Windows Server Backup
Open the Server Manager on the machine hosting the AD LDS instance.
Navigate to “Tools” and select “Windows Server Backup.”
In the Windows Server Backup console, choose “Local Backup.”
Select “Backup Once” or “Custom” to configure a scheduled backup.
Choose the backup location and specify items to be backed up, including the AD LDS instance.
Backup Using Ldp.exe
Launch the Ldp.exe utility.
Connect to the AD LDS instance.
From the menu, select “Connect” and specify the server and port.
Navigate to “Browse” and select the root of the directory tree.
Choose “Export” from the menu and save the LDIF file to a secure location.
PowerShell Scripting:
Utilize PowerShell scripts to automate the backup process.
Create a script that uses the Backup-ADLDSInstance cmdlet to initiate the backup.
Restoring an AD LDS Instance
Windows Server Backup Restore
Open the Windows Server Backup console.
Choose “Recovery” and select the backup set containing the AD LDS data.
Specify the location to restore the data, ensuring it aligns with the original instance configuration.
Follow the prompts to complete the restoration process.
Ldp.exe Import
Launch the Ldp.exe utility.
Connect to the target AD LDS instance.
From the menu, select “Browse” and navigate to the root of the directory tree.
Choose “Import” and select the LDIF file created during the backup.
Confirm the import to restore the data.
PowerShell Scripting
Utilize PowerShell scripts to automate the restoration process.
Create a script that uses the Restore-ADLDSInstance cmdlet to initiate the restore.
Regularly Schedule Backups: Establish a routine backup schedule to ensure that data is consistently protected. This helps in mitigating potential data loss.
Document the Backup Process: Maintain clear documentation on the backup procedures, including the tools used, backup frequency, and locations.
Test Restorations: Periodically test the restoration process to verify its effectiveness. This ensures that, in the event of a disaster, the restoration can be executed smoothly.
Secure Backup Files: Store backup files in secure locations with controlled access to prevent unauthorized tampering or deletion.
Synchronize Data from AD DS to AD LDS
Synchronizing data from Active Directory Domain Services (AD DS) to Active Directory Lightweight Directory Services (AD LDS) is a common requirement for organizations that utilize both directory services. This process ensures that data consistency is maintained across different directory environments. Here’s a step-by-step guide on how to synchronize data from AD DS to AD LDS.
Using the Active Directory Lightweight Directory Services Setup Wizard
Launch the AD LDS Setup Wizard
Open the Active Directory Lightweight Directory Services Setup Wizard on the server hosting the AD LDS instance.
Choose “Add a Replica to an Existing AD LDS Instance”
Select the option to add a replica to an existing AD LDS instance.
Specify the AD LDS instance to which you want to synchronize data.
Specify Connection Details
Provide the connection details for the AD DS domain controller.
Enter the server name, port (default is 389 for LDAP), and credentials with the necessary permissions to read data from AD DS.
Select Application Directory Partitions
Choose the specific application directory partitions in AD DS that you want to synchronize with AD LDS.
Ensure that the selected partitions align with the data you need in the AD LDS instance.
Configure Synchronization Settings
Set synchronization options, such as the schedule for replication and whether to enable two-way synchronization.
Adjust other settings based on your organization’s requirements.
Review and Confirm
Review the configuration settings to ensure accuracy.
Confirm your selections, and the wizard will initiate the synchronization process.
Monitor Progress
Monitor the synchronization progress through the Active Directory Sites and Services console or other relevant tools.
Check for any errors or warnings that may require attention.
Using PowerShell Commands
Use repadmin Command
Open PowerShell with administrative privileges.
Use the repadmin /add ADLDSInstance DSInstance /dsaguid:GUID command to add the AD LDS instance as a replica to the AD DS instance.
Configure Replication Settings
Set up replication settings using the repadmin /syncall command or other relevant commands.
Specify the source and destination servers for synchronization.
Verify Replication Status
Use the repadmin /showrepl command to verify the replication status and ensure that data is flowing correctly between AD DS and AD LDS.
Get real time update about this post categories directly on your device, subscribe now.
Anshika is the computing editor of ITHelpSupport. If you need to know anything about computing components, PC gaming or the best laptops on the market,
If you have any questions or concerns about the matter above, please don't hesitate to comment...


