Whenever a new version of Windows comes out, it’s inevitable that there are going to be updates that need to be installed. Sometimes, however, these updates cause more problems than they fix and you might want to uninstall them. In this article we show you how to manually uninstall Windows 11 updates
What is Windows 11?
Windows 11 is the latest version of Microsoft Windows. It is currently in live and testing for public consumption. However, a leaked version of the operating system has been making its rounds on the internet, giving us a first look at what to expect from the new operating system.
One of the most notable changes in Windows 11 is the removal of the Updates tab from the Settings app. This change was first spotted in the leaked version of Windows 11 and it has been confirmed by Microsoft that this change will be present in the final version of Windows 11 as well.
Microsoft has not given a reason for why they are removing the Updates tab from the Settings app but it is likely because they want to move all update-related settings to the new Windows Update Center app. This app is not yet available on the leaked version of Windows 11 but it is expected to be included in the final release.
If you are someone who regularly installs updates for Windows, you may be wondering how you will be able to do so without the Updates tab in the Settings app. Thankfully, Microsoft has provided a few different ways that you canstill install updates in Windows 11.
How to Uninstall Windows Updates in Windows 11
If you’re running Windows 11, there’s a new way to uninstall updates that are giving you brief. Here’s how it works.
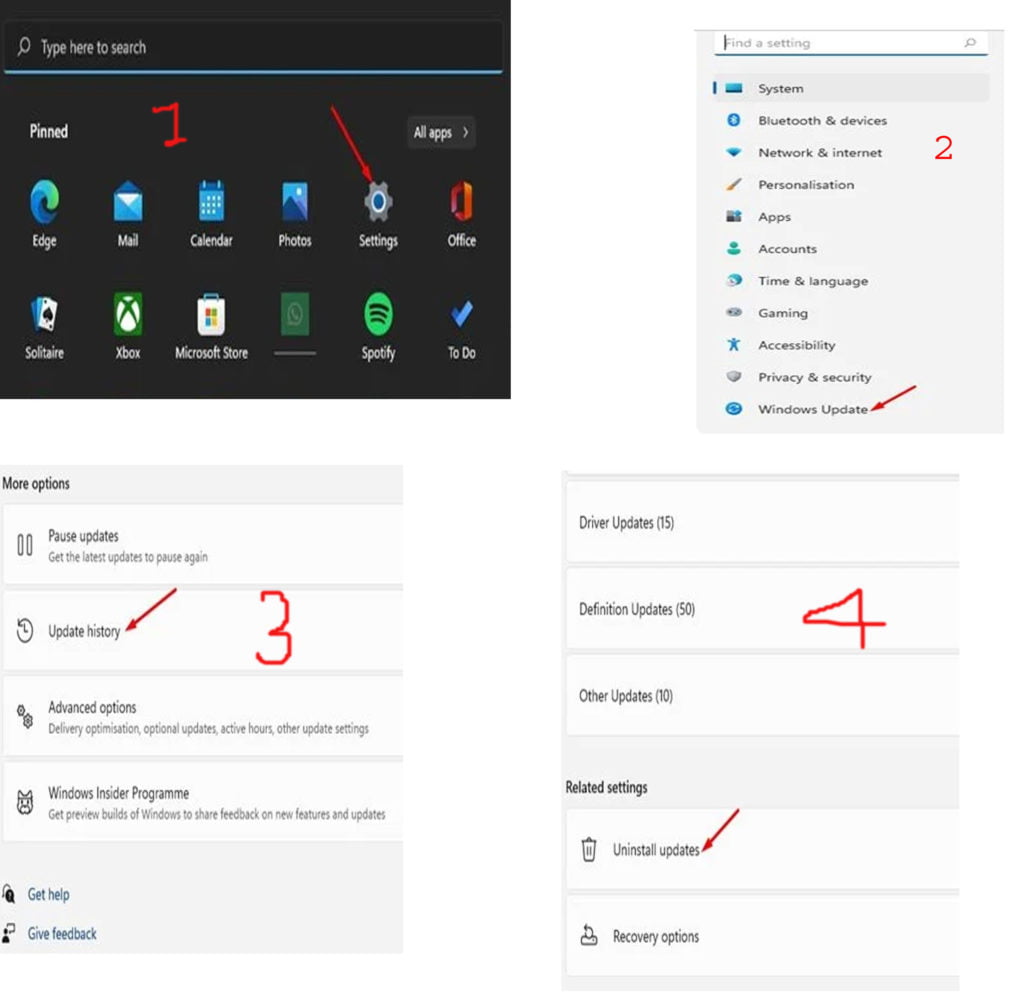
First, open the Settings app by hitting Start and then typing in “Settings.” Click the Windows Update icon.
Next, click on View Update History.
Now, find the update that you want to uninstall in the list and click on its entry. You’ll see a new page with more details about the update.
At the top of this page, you’ll see an Uninstall button. Click it and then follow the prompts to uninstall the update.
That’s all there is to it! This process should work for any updates that are giving you trouble, whether they’re security updates, driver updates, or anything else.
Uninstall Windows 11 Updates via PowerShell
If you’re running Windows 11, there’s a new process for uninstalling updates that’s a little different from older versions of the OS. In this guide, we’ll show you how to uninstall updates using PowerShell.
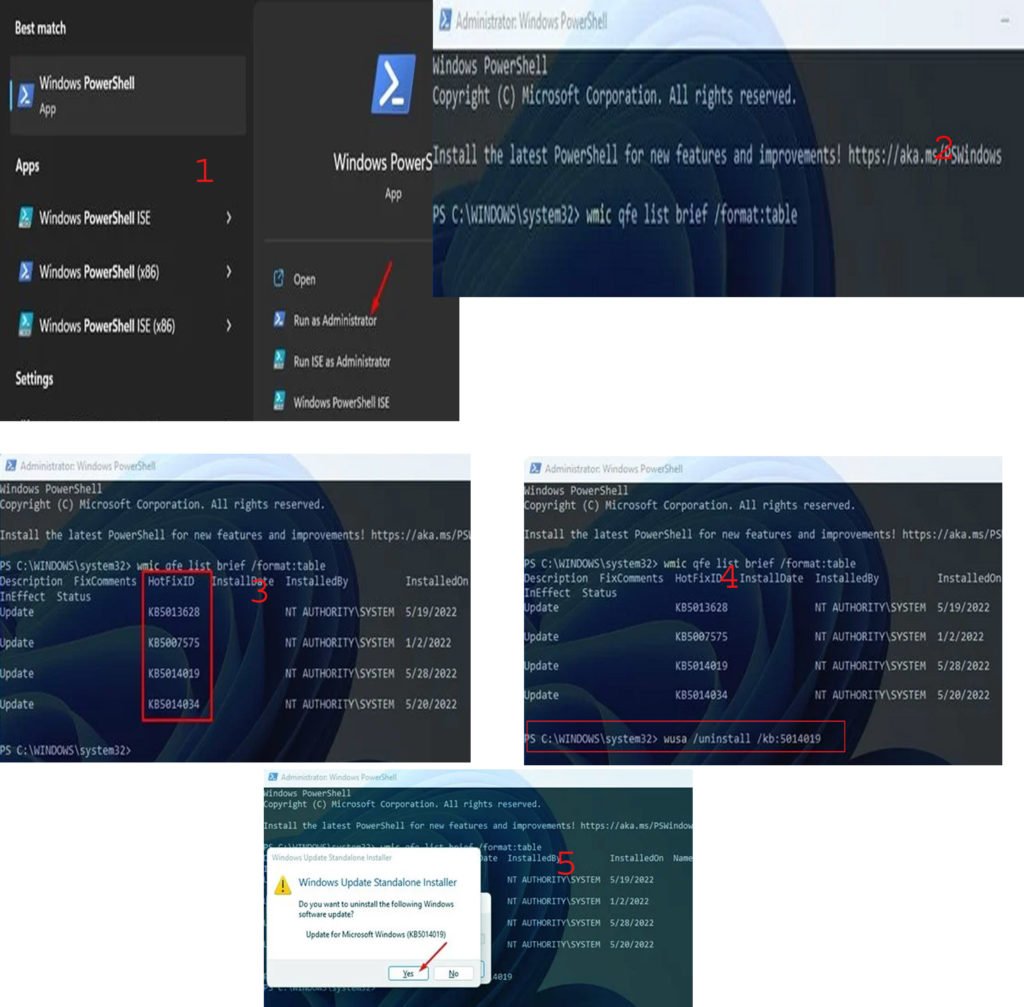
First, open PowerShell as an administrator. Then, type in the following command and hit Enter:
wmic qfe list brief /format:table
That command will list a table of all Windows 11 updates installed on your device. You need to note down the HotfixID
wusa /uninstall /kb:HotFixID
Replace the HotFixID with the update’s identification number. For example, if you want to uninstall an update KB5014019, the command would look like
wusa /uninstall /kb:5014019
Once done, hit the Enter button, click on the Yes button.
Limitations of Manually Uninstalling Updates in Windows 11
There are a number of reasons why you might want to uninstall updates in Windows. Maybe you’re having problems with a particular update and need to roll back to a previous version. Or maybe you just want to free up some space on your hard drive.
Whatever the reason, there are a few things you should know before uninstalling updates in Windows. First, not all updates can be uninstalled. Some are considered “critical” updates that must be kept in place for your system to remain secure and stable.
Second, even if an update can be uninstalled, doing so may cause problems with your system. That’s because uninstalling an update can sometimes break dependencies that other components on your system rely on.
So, before you go ahead and uninstall any updates, it’s important to understand the risks involved.
Alternatives to Manually Uninstall Windows 11 Updates
If you’re like most people, you probably don’t enjoy dealing with updates. They can be time-consuming, and sometimes they can cause problems with your computer.
Fortunately, there are some alternatives to manually uninstalling updates in Windows 11. Here are a few of the most popular methods:
1. Use the Windows Update Troubleshooter
The Windows Update Troubleshooter is a built-in tool that can help you resolve problems with updates. To use it, simply go to Settings > Update & Security > Troubleshoot. Then, click on the “Windows Update” troubleshooter and follow the instructions.
2. Delete the Software Distribution Folder
The Software Distribution Folder is where Windows stores temporary files for updates. If this folder becomes corrupted, it can cause problems with updates. To delete it, press the Windows key + R to open the Run dialog box. Then, type “C:\Windows\SoftwareDistribution” and hit Enter. This will open the folder in File Explorer. From here, you can delete everything inside of it.
3. Use DISM to Fix Problems With Updates
DISM (Deployment Image Servicing and Management)
How to Install Windows 11 Update or Upgrade
Conclusion
We hope this guide has helped you uninstall updates in Windows. While it’s generally not recommended to remove updates, there are times when it’s necessary. If you’re having trouble with a particular update, uninstalling it may be the best course of action. Just be sure to follow the instructions carefully so that you don’t accidentally delete any important files.
-: Fix Keyboard Not Working in Windows 11


