Your browsing history in Google Chrome contains a record of the websites you’ve visited, searches you’ve made, and other online activities. While browsing history can be helpful for quickly revisiting previously viewed pages, there are times when you might want to clear this data for privacy reasons or to improve browser performance. In this step-by-step guide, we will walk you through the process of clear your browsing history in Google Chrome.
Step 1: Open Google Chrome
Launch the Google Chrome web browser on your computer. You can do this by clicking on the Chrome icon on your desktop or by searching for “Google Chrome” in your computer’s application launcher.
Step 2: Access the History Menu
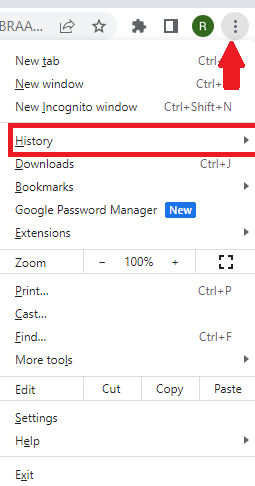
Once Chrome is open, look for the three-dot menu icon located in the top-right corner of the browser window. Click on the icon to open a drop-down menu.
Step 3: Navigate to the History Page
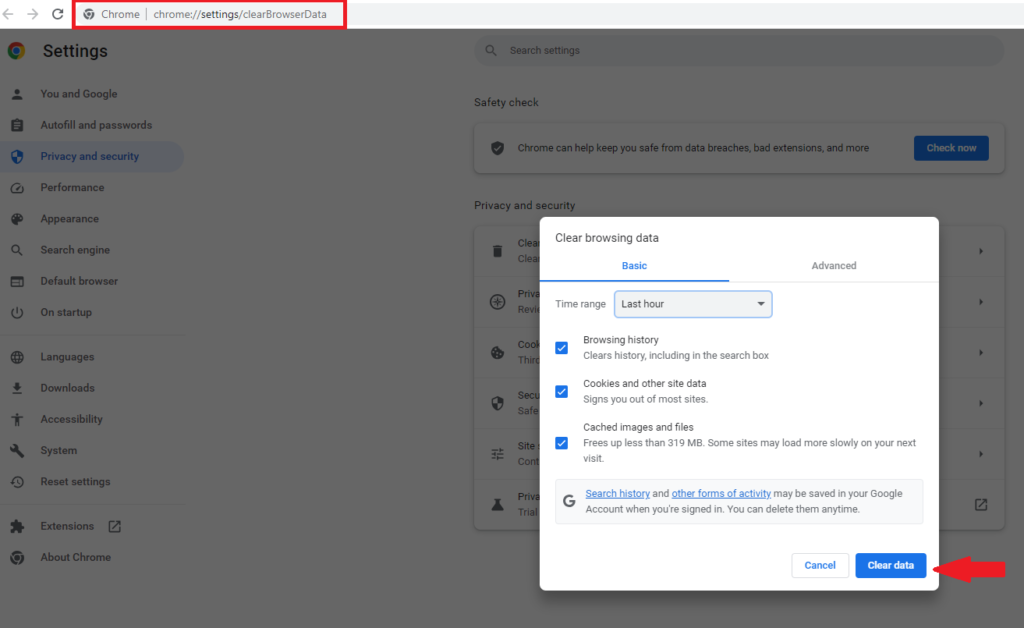
In the drop-down menu, hover your mouse over the “History” option. This will open another menu with different history-related options. From this second menu, click on “History.” or direct access chrome://settings/clearBrowserData
Alternatively, you can use a keyboard shortcut to access the History page directly. Press “Ctrl + H” on Windows or “Command + Y” on Mac to open the History page.
Step 4: Clear Browsing Data
You will now be taken to the History page, where you’ll see a list of your browsing history arranged by date. On the left-hand side of the page, you’ll find the “Clear browsing data” option. Click on it to proceed.
Step 5: Choose Time Range
A pop-up window titled “Clear browsing data” will appear. In this window, you have the option to choose the time range for which you want to clear your browsing data. You can select from preset options such as “Last hour,” “Last 24 hours,” “Last 7 days,” or “From the beginning of time.”
Step 6: Select Types of Data to Clear
In the same pop-up window, you’ll see a list of different types of browsing data you can clear, including:
– Browsing history
– Cookies and other site data
– Cached images and files
– Download history
– Passwords
– Autofill form data
– Site settings
By default, only the “Browsing history” option is selected. If you want to clear other types of data as well, check the corresponding boxes.
Step 7: Confirm and Clear Data
After selecting the time range and types of data you want to clear, click on the “Clear data” button at the bottom of the pop-up window.
A confirmation dialog will appear, asking you to confirm that you want to delete the selected data. Click “Clear” to proceed.
Step 8: Wait for Clearing Process
Chrome will begin clearing the selected browsing data. Depending on the amount of data and the options you chose, the process may take a few seconds or longer.
Step 9: Confirmation
Once the clearing process is complete, a notification will appear at the bottom-right corner of the browser window, indicating that your browsing data has been cleared.
Conclusion
Clearing your browsing history in Google Chrome is a simple and effective way to maintain your privacy and improve browser performance. By following the step-by-step guide outlined in this article, you can easily clear your browsing history and other selected data based on your preferences. Whether you want to remove your recent browsing activity or clear your entire history, Google Chrome provides you with the flexibility to control your browsing data. Remember to use this feature judiciously and consider the impact on your browsing experience before clearing your history. Happy browsing!


Comments 2